探究 Java 线程池
经常看到 线程池 相关问题,之前做过一个线程池小 Demo,不过总是忘记流程原理,这次直接阅读下源码,观察下具体实现。
JDK:Oracle jdk1.8.0_351
一开始使用了 JDK21,又是虚拟线程又是巴拉巴拉给我整蒙了,果断换回了 JDK8 ~~
基本使用
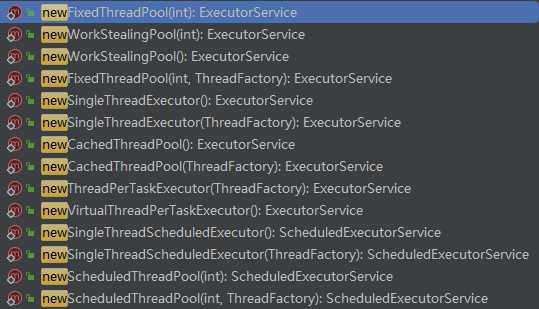
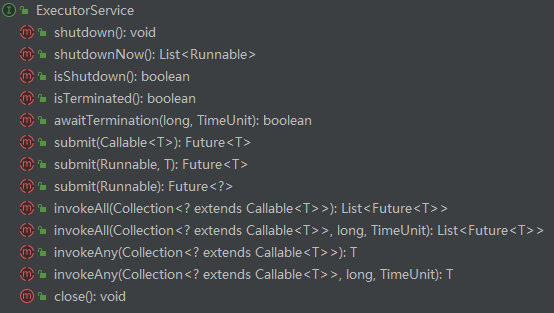
Excutors 是一个 ExecutorService 接口的工厂类,通过快速创建出所需要的具体线程池实现对象,观察 ExecutorService 接口,我们可以看到有可使用方法。
简单做个测试:
/**
 * @author yancy0109
 * @date 2024/4/7
 */
public class Demo {
    public static void main(String[] args) {
        ExecutorService service = Executors.newFixedThreadPool(3);
        for (int i = 0; i < 10; i++) {
            final int missionId = i;
            service.submit(() -> {
                final String print = Thread.currentThread().getName() + ":" + "mission" + missionId;
                System.out.println(print);
            });
        }
        service.close();
    }
}
输出如下:
pool-1-thread-3:mission2
pool-1-thread-1:mission0
pool-1-thread-2:mission1
pool-1-thread-3:mission3
pool-1-thread-2:mission4
pool-1-thread-3:mission6
pool-1-thread-3:mission8
pool-1-thread-2:mission7
pool-1-thread-1:mission5
pool-1-thread-3:mission9
可以看到,虽然提交任务是顺序的,但是执行任务的线程并不是顺序执行,而是随机并发执行,并且由于使用了 FixedThreadPool,线程仅仅出现了3个ID。
newFixedThreadPool,便是我们要了解的目标。
ThreadPoolExecutor
从名字看,线程池执行器
构造方法
下面这个构造方法是最完整参数版本了。
- int corePoolSize:线程中核心线程数,即时他们处于空闲,除非设定了 allowCoreThreadTimeout
- int maximumPoolSize:池中允许的最大线程数
- long keelAliveTime:当线程数大于核心数时,这是多余的空闲线程在终止前等待新任务的最长时间
- TimeUnit unit:keepAliveTime 参数的时间单位
- BlockingQueue<Runnable> workQueue:在任务执行前保存任务的队列。保存通过 execute 方法提交的 Runnable 任务
- ThreadFactory threadFactory:创建新线程时使用的工厂
- RejectedExecutionHandler handler:当到达线程边界和队列容量而导致执行阻塞时使用的处理程序
public ThreadPoolExecutor(int corePoolSize,
                          int maximumPoolSize,
                          long keepAliveTime,
                          TimeUnit unit,
                          BlockingQueue<Runnable> workQueue,
                          ThreadFactory threadFactory,
                          RejectedExecutionHandler handler) {
    if (corePoolSize < 0 ||
        maximumPoolSize <= 0 ||
        maximumPoolSize < corePoolSize ||
        keepAliveTime < 0)
        throw new IllegalArgumentException();
    if (workQueue == null || threadFactory == null || handler == null)
        throw new NullPointerException();
    this.acc = System.getSecurityManager() == null ?
            null :
            AccessController.getContext();
    this.corePoolSize = corePoolSize;
    this.maximumPoolSize = maximumPoolSize;
    this.workQueue = workQueue;
    this.keepAliveTime = unit.toNanos(keepAliveTime);
    this.threadFactory = threadFactory;
    this.handler = handler;
}
其中有三个参数比较模糊,采用接口对象进行接收,可以由我们自行选择实现类。
- BlockingQueue<Runnable>
- ThreadFactory
- RejectedExecutionHandler
这个简单,我们去看一下它们的默认实现,不就知道是什么?怎么用?又怎么实现啦?
参考 Executors.newFixedThreadPool 方法:
- BlockingQueue -> LinkedBlockingQueue
- ThreadFactory -> DefaultThreadFactory
- RejectedExcutionHandler -> AbordPolicy
在进入线程池的处理流程之前,我们先来看看这几个东东的实现吧。
三个特殊参数
ThreadFactory
接口信息如下
public interface ThreadFactory {

    /**
     * 创建new Thread, 可以初始化优先级,名称,守护进程状态,ThreadGroup
     * @param r a runnable to be executed by new thread instance
     * @return constructed thread, or {@code null} if the request to
     *         create a thread is rejected
     */
    Thread newThread(Runnable r);
}
默认实现类由 Executors 提供:DefaultThreadFactory
/**
 * The default thread factory
 */
static class DefaultThreadFactory implements ThreadFactory {
    // 通过Unsafe CAS自增原子类
    private static final AtomicInteger poolNumber = new AtomicInteger(1); // 线程池ID,static 全局共用
    private final ThreadGroup group; // 线程组
    private final AtomicInteger threadNumber = new AtomicInteger(1); // 线程ID,private 单线程池内使用
    private final String namePrefix; // 线程名称前缀

    DefaultThreadFactory() {
        SecurityManager s = System.getSecurityManager();
        group = (s != null) ? s.getThreadGroup() :
                              Thread.currentThread().getThreadGroup(); // 通过ThreadGroup管理当前线程池内线程
        namePrefix = "pool-" +
                      poolNumber.getAndIncrement() +
                     "-thread-"; // Prefix = pool_线程池ID-thread-
    }

    public Thread newThread(Runnable r) {
        Thread t = new Thread(group, r,
                              namePrefix + threadNumber.getAndIncrement(),
                              0); // 0,指定线程堆栈大小为默认大小
        if (t.isDaemon()) // 见补充
            t.setDaemon(false);
        if (t.getPriority() != Thread.NORM_PRIORITY) // 修改线程优先级为 NORAML_PRIORITY
            t.setPriority(Thread.NORM_PRIORITY);
        return t;
    }
}
这里涉及了 Deamon,这个我查一次忘一次,上次还是写 Netty 服务用到,不过平时业务是涉及不到。
补充:Deamon,来源查询。
Deemon Thread:
作为后台支持服务
用于执行一些辅助性、支持性的后台任务,这些任务与程序主体逻辑相对分离,但对程序的正常运行起到支撑作用。如GC线程。
资源清理
当非守护线程(用户线程)执行完毕后,即时还有守护线程在运行,JVM 也会安全退出,此时守护线程会随着 JVM 关闭而终止,无需等待其自然完成。这意味着守护线程可以用于执行清理工作,如 关闭数据库连接、释放系统资源、写入日志等,确保程序在退出时环境整洁。
我对前部分没有什么异议,后半段不敢苟同,既然它会随着 JVM 关闭而强制结束,那么岂不是会导致关闭一半就结束了,我认为更合适的关闭资源可以通过注册 ShutdownHook。
持续监控
状态检测,持续监控系统的状态、执行周期性的检查/维护任务。如 监控内存使用情况,检查磁盘空间、定时任务等。
避免阻塞程序退出
如果有线程为非用户线程,即守护线程,即时陷入无限循环,也不会阻塞 JVM 退出。
轻量级服务
低优先级,用于执行相对次要、对响应速度要求不高/可以容忍偶尔中断的服务。
好了,这个默认线程就是通过传递 Runable 接口的任务对象,初始化一个 Thread 对象进行返回。
BlockingQueue
概览
字面意思,阻塞队列,这个接口太长啦,总之,是用于存取任务的队列,因为我们要从一端提交新的任务,线程池的线程将从其中取出任务进行处理,所以我们选择了队列实现,由于线程竞争,我们还必须保证并发存取的安全。
那么我们去看一下 Excutors#newFixedThreadPool 使用的默认实现 - LinkedBlockingQueue。
主要方法其实大家都能猜测到,队列基本实现嘛~问题在于并发如何处理的呢?
/** Lock held by take, poll, etc */
private final ReentrantLock takeLock = new ReentrantLock();

/** Wait queue for waiting takes */
private final Condition notEmpty = takeLock.newCondition();

/** Lock held by put, offer, etc */
private final ReentrantLock putLock = new ReentrantLock();

/** Wait queue for waiting puts */
private final Condition notFull = putLock.newCondition();
ReentrantLock 是一种可重入锁,我在 分析 AQS 文章中,就是 从 ReentrantLock 进行入手的,但却忽略了 Condition 的部分,在这里顺着看一看吧(搞得我又跑过去复习了下 AQS。。。。)
从当前代码,我们可以看出 Condition 对象 是与 ReentrantLock 对象 相关联的。
而 LinkedBlockingQueue 对于其只调用了两个方法:await,signal。即 等待 / 唤醒。
由方法字面意思我们可以明白,这个方法使得线程主动进入等待状态 / 唤醒所有等待线程。
take方法
简单来看看这段代码,这代代码就已经涉及了 await,signal 两个方法:
take 方法,return 泛化类型 <E>
public E take() throws InterruptedException {
    E x;
    int c = -1;
    final AtomicInteger count = this.count;
    final ReentrantLock takeLock = this.takeLock;
    takeLock.lockInterruptibly(); // 获取当前消费者锁
    try {
        while (count.get() == 0) { // 如果当前 count == 0 --> 没有可消费内容
            notEmpty.await();	// 当前线程需要 await 进入阻塞,排队等待NotEmptyCondition
        }
        x = dequeue(); // 修改当前Queue节点,忽略实现
        c = count.getAndDecrement(); // 消费
        if (c > 1)
            notEmpty.signal(); // 仍为NotEmptyCondition,signal Waiter
    } finally {
        takeLock.unlock(); // 最终释放takeLock
    }
    if (c == capacity)
        signalNotFull(); // 唤醒
    return x;
}
需要注意的是,我们在对 Condition 进行方法调用时,我们是先获取了当前关联 ReentrantLock 锁,才进行操作 Condition,也就是说,在 Condition 对象内部调用的方法,涉及对 ReentrantLock.state 进行修改,已经不许要考虑并发。
- await:当前没有可消费内容,线程进入 Condition 等待队列,线程阻塞,等待唤醒
- signal:当前 有可消费内容 / 生产空间已满,需要唤醒阻塞线程进行消费
await - 1
接下来浅看一下源码吧,await 将会分析一部分,剩下在其后继续分析:
/**
* 加入Waiter节点,等待唤醒
 */
public final void await() throws InterruptedException {
    if (Thread.interrupted()) // 如果线程中断 Throw Exception
        throw new InterruptedException();
    Node node = addConditionWaiter(); // 添加 Waiter节点至当前 ConditionObject.WaiterList
    int savedState = fullyRelease(node); // 释放锁,获取当前加锁state;此时其他线程又可以对ReentrantLock进行加锁啦
    int interruptMode = 0;
    while (!isOnSyncQueue(node)) {
        LockSupport.park(this);	// 进入阻塞
        if ((interruptMode = checkInterruptWhileWaiting(node)) != 0)
            break;
    }
    // 此时结束了休眠 || 线程设置了中断标志
    if (acquireQueued(node, savedState) && interruptMode != THROW_IE) // 重新获取锁
        interruptMode = REINTERRUPT;
    if (node.nextWaiter != null) // clean up if cancelled
        unlinkCancelledWaiters();
    if (interruptMode != 0)
        reportInterruptAfterWait(interruptMode);
}


/**
 * Adds a new waiter to wait queue. wait queue 由 AQS.ConditionObject 进行保存
 */
private Node addConditionWaiter() {
    Node t = lastWaiter;
    // If lastWaiter is cancelled, clean out. 检查删除已取消节点. (fullyRelease失败,会更新为Node.CANCELLED)
    if (t != null && t.waitStatus != Node.CONDITION) {
        unlinkCancelledWaiters();
        t = lastWaiter;
    }
    // 连接保存当前节点
    Node node = new Node(Thread.currentThread(), Node.CONDITION);
    if (t == null)
        firstWaiter = node;
    else
        t.nextWaiter = node;
    lastWaiter = node;
    return node; // 返回当前Condition队列中的waiterNode
}
上方代码还调用了 fullyRelease,对锁进行了释放,返回了当前加锁次数。
事实上调用了这行代码后,相当于将锁进行了暂时释放,而保存加锁次数,是便于线程于 Condition waitList 休眠后,还能再次抢占同样的锁,这样在调用这方法的上层代码中,我们只是观察到了调用 Condition#await 进行了休眠,休眠前后锁状态事实上是一样的。
/**
 * Invokes release with current state value; returns saved state.
 * Cancels node and throws exception on failure.
 * @param node the condition node for this wait
 * @return previous sync state
 */
final long fullyRelease(Node node) {
    boolean failed = true;
    try {
        long savedState = getState(); // 获取当前可重入锁加锁state
        if (release(savedState)) {	// release -> 外部调用先通过 ReentrantLock 加锁,在这里调用 AQS#release 模板方法释放锁
            failed = false;	// successed
            return savedState; // 返回 state
        } else {
            throw new IllegalMonitorStateException();
        }
    } finally {
        if (failed) // 失败
            node.waitStatus = Node.CANCELLED;	// 当前Condition节点状态失败
    }
}
那么我有个问题:为什么要释放锁呢?假如不释放锁,其他竞争线程不是也会阻塞在 ReentrantLock 吗?当前模式下,其他线程也会进行抢锁进入同步代码块,也可能出现再次进入 Wait 队列阻塞的情况。通过 ReentrantLock 实现这种阻塞,又有什么区别?
signal
我认为这与 AQS.ConditionObject#signal 实现方法有关,请看 VCR:
// AQS public methods
/**
 * Moves the longest-waiting thread, if one exists, from the
 * wait queue for this condition to the wait queue for the
 * owning lock.
 *
 * @throws IllegalMonitorStateException if {@link #isHeldExclusively}
 *         returns {@code false}
 */
public final void signal() {
    if (!isHeldExclusively())
        throw new IllegalMonitorStateException();
    Node first = firstWaiter;
    if (first != null)
        doSignal(first); // 移除firstNode,unpark FirstNode->thread
}

// ReentrantLock.Sync
protected final boolean isHeldExclusively() {
    // While we must in general read state before owner,
    // we don't need to do so to check if current thread is owner
    return getExclusiveOwnerThread() == Thread.currentThread();
}
只有当前线程持有锁,才可以对 Condition 等待队列中的节点进行唤醒。
假如我们不释放锁交由其他线程进入临界区,signal 方法也没法调用~哦吼,完蛋,await 线程会导致整个 ReentrantLock 相关线程死锁。
我出现了个脑洞坑:为什么要这样呢?假如 signal 方法可以由非抢占锁线程调用,是否就可以让 await 线程不移除锁,而是交由 AQS 内部队列进行排队,此时 与 ConditionObject 相关的阻塞线程,都会去 AQS 队列中排队,嗯。。。想想其实是不合适!
从 ConditionObject 使用来说,我们是要抢到锁的线程主动进行休眠,这个休眠并不是由于 AQS.state 竞争引起的,而是由于某种 Condition 而主动进行阻塞,与其相关 Condition 引起阻塞的线程,都应该在这个对象下进行排队。
而唤醒队列元素,也要获取锁后通过 ConditionObject 进行通知唤醒。 还要继续看 signal 方法的实现,它有一点对 await 方法有关
/**
 * Removes and transfers nodes until hit non-cancelled one or
 * null. Split out from signal in part to encourage compilers
 * to inline the case of no waiters.
 * @param first (non-null) the first node on condition queue
 */
private void doSignal(Node first) {
    do {
        if ( (firstWaiter = first.nextWaiter) == null)
            lastWaiter = null;
        first.nextWaiter = null;
    } while (!transferForSignal(first) &&  // 唤醒首个有效节点, 并置入AQS同步队列
             (first = firstWaiter) != null);
}

/**
 * Transfers a node from a condition queue onto sync queue.
 * Returns true if successful.
 * @param node the node
 * @return true if successfully transferred (else the node was
 * cancelled before signal)
 */
final boolean transferForSignal(Node node) {
    /*
     * If cannot change waitStatus, the node has been cancelled.
     */
    if (!compareAndSetWaitStatus(node, Node.CONDITION, 0)) // CAS 修改Node状态
        return false; // 失败则返回,Node已被取消,此时说明目标node.thread被中断

    /*
     * Splice onto queue and try to set waitStatus of predecessor to
     * indicate that thread is (probably) waiting. If cancelled or
     * attempt to set waitStatus fails, wake up to resync (in which
     * case the waitStatus can be transiently and harmlessly wrong).
     */
    Node p = enq(node); // Node置入AQS同步队列
    int ws = p.waitStatus;
    if (ws > 0 || !compareAndSetWaitStatus(p, ws, Node.SIGNAL)) // 修改AQS队列中NODE.waitStatus,准备唤醒其后继节点
        LockSupport.unpark(node.thread); // 唤醒NODE对应的阻塞线程
    return true;
}
await - 2
继续来阅读 await 方法实现吧,目前大致流程我们猜到了,还有一些方法细节还可以再看看~
public final void await() throws InterruptedException {
    if (Thread.interrupted()) // 如果线程中断 Throw Exception
        throw new InterruptedException();
    Node node = addConditionWaiter(); // 添加 Waiter节点至当前 ConditionObject.WaiterList
    int savedState = fullyRelease(node); // 释放锁,获取当前加锁state;此时其他线程又可以对ReentrantLock进行加锁啦
    int interruptMode = 0;
    while (!isOnSyncQueue(node)) { // 当前节点非同步队列节点继续循环,方法细节可以向下看方法注释
        LockSupport.park(this);	// 进入阻塞
        if ((interruptMode = checkInterruptWhileWaiting(node)) != 0) // 检查是否有中断发生,中断则退出
            break;
    }
    // 此时结束了休眠(unpark线程 || 线程被中断)
    if (acquireQueued(node, savedState) && interruptMode != THROW_IE) // 重新获取锁
        interruptMode = REINTERRUPT; // 条件为 acquireQueued发生中断 && interruptMode == 0 / REINTERRUPT
    if (node.nextWaiter != null) // clean up if cancelled
        unlinkCancelledWaiters(); // 在持有锁的适合清除 WaiterNode
    if (interruptMode != 0)
        reportInterruptAfterWait(interruptMode); // THROW_IE 或者 REINTERRUPT就设置中断标记
}

/**
* 判断是否在同步队列中
* 如果不在,则需要休眠
* 否则,已经被unpark唤醒,进入AQS同步队列了,不需要再次休眠
**/
final boolean isOnSyncQueue(Node node) {
    if (node.waitStatus == Node.CONDITION || node.prev == null) // 当前Condition初始化,第一次进入方法,会在这里进行返回
        return false;
    if (node.next != null) // 如果node.next != null,此时已经处于AQS同步队列
        return true;
	return findNodeFromTail(node);
}

/**
* 尝试从tail向前寻找node
*/
private boolean findNodeFromTail(Node node) {
    Node t = tail;
    for (;;) {
        if (t == node)
            return true;
        if (t == null)
            return false;
        t = t.prev;
    }
}

private int checkInterruptWhileWaiting(Node node) {
    return Thread.interrupted() ? // 如果标记中断
        (transferAfterCancelledWait(node) ? // 更改NODE,置入AQS同步队列
            THROW_IE : // 成功置入,准备抛出中断异常 return -1;
            REINTERRUPT) // 未成功 说明是 signal First Waiter后被中断 return 1;
        : 0; // 无中断
}


final boolean transferAfterCancelledWait(Node node) {
    if (compareAndSetWaitStatus(node, Node.CONDITION, 0)) { // CAS修改NODE状态
        enq(node);
        return true;
    }
    /*
     * If we lost out to a signal(), then we can't proceed
     * until it finishes its enq().  Cancelling during an
     * incomplete transfer is both rare and transient, so just
     * spin.
     * 此时发生了中断,但是我们发现node被修改了
     * 说明有线程signal当前node,我们要等待调用线程将该节点放入同步队列,再退出
     */
    while (!isOnSyncQueue(node))
        Thread.yield();
    return false;
}

/**
 * Acquires in exclusive uninterruptible mode for thread already in
 * queue. Used by condition wait methods as well as acquire.
 *
 * @param node the node
 * @param arg the acquire argument
 * @return {@code true} if interrupted while waiting  在等待过程中是否中断
 * AQS重新获取锁的功能,当 node 位于同步队列队首就进行 CAS 抢锁
 */
final boolean acquireQueued(final Node node, int arg) {
    boolean failed = true;
    try {
        boolean interrupted = false;
        for (;;) {
            final Node p = node.predecessor();
            if (p == head && tryAcquire(arg)) {
                setHead(node);
                p.next = null; // help GC
                failed = false;
                return interrupted;
            }
            if (shouldParkAfterFailedAcquire(p, node) &&
                parkAndCheckInterrupt())
                interrupted = true;
        }
    } finally {
        if (failed)
            cancelAcquire(node);
    }
}
总结
Singal:
唤醒首个有效WaiterNode,并置入 AQS 同步队列,便于相关Node线程再次尝试获取锁
Await:
进入阻塞
苏醒
判断唤醒原有
- signal,此时处于AQS同步队列,再次尝试获取锁,最终退出
- 中断,主动进入 AQS 同步队列,再次尝试获取锁,抛出 中断异常
- singal,但是唤醒后又被中断,此时主动再次标记中断标识
RejectExecutionHandler
线程池拒绝处理器
我们首先来看一下接口
public interface RejectedExecutionHandler {
    void rejectedExecution(Runnable r, ThreadPoolExecutor executor);
}
Runable r,则为提交的任务对象
executor,则为当前线程池看一下默认
简单看一下几个默认实现类来了解一下该 Handler 的实现与使用吧~
  public static class CallerRunsPolicy implements RejectedExecutionHandler {
      public CallerRunsPolicy() { }

      public void rejectedExecution(Runnable r, ThreadPoolExecutor e) {
          if (!e.isShutdown()) {
              r.run(); // 使用当前提交任务线程执行任务
          }
      }
  }

  public static class AbortPolicy implements RejectedExecutionHandler {
      public AbortPolicy() { }
      /*
      * 直接抛异常
      */
      public void rejectedExecution(Runnable r, ThreadPoolExecutor e) {
          throw new RejectedExecutionException("Task " + r.toString() +
                                               " rejected from " +
                                               e.toString());
      }
  }

  public static class DiscardPolicy implements RejectedExecutionHandler {
      public DiscardPolicy() { }
      public void rejectedExecution(Runnable r, ThreadPoolExecutor e) {
        // 直接丢弃
      }
  }

  public static class DiscardOldestPolicy implements RejectedExecutionHandler {
      public DiscardOldestPolicy() { }
      public void rejectedExecution(Runnable r, ThreadPoolExecutor e) {
          if (!e.isShutdown()) {
              e.getQueue().poll(); // poll最先提交的任务,丢弃
              e.execute(r); // 将该任务重新提交
          }
      }
  }s
线程池任务执行
了解完其相关参数结构,我们来继续了解线程池的实现与执行。
submit
按照我们的使用,只需要调用 submit 方法,即可提交一个 Runable 接口的任务
该方法是由 Executors 接口实现,由 AbstractExecutorService 进行模板方法实现。
public abstract class AbstractExecutorService implements ExecutorService {
	// ......

    /**
     * @throws RejectedExecutionException {@inheritDoc}
     * @throws NullPointerException       {@inheritDoc}
     */
    public <T> Future<T> submit(Runnable task, T result) {
        if (task == null) throw new NullPointerException();
        // Future 可以包装一个 Runable 接口,作为执行 task
        // 并且内部提供了任务状态属性的参数,包装waitDone等方法,
        // 使得调用获取结果的方法,可以阻塞等待结果
        RunnableFuture<T> ftask = newTaskFor(task, result);
        // 通过执行 ftask实现的run接口,对Runable task进行了二次包装
        // 虽然execute传入了runbale接口,但是实际传入了RunnableFuture对象
        // 该对象方法流程内实现了对Future属性状态等维护,使得submit返回后,可以通过操作ftask来更多样化的处理结果
        execute(ftask);
        return ftask;
    }
    // ......
}
再向下就要看到 execute 方法内部啦,其实整个线程池实现重点流程就在这里了,这个方法接收了 Runnable 接口对象
它只关心它线程池内部任务调度实现,对于传参而言,只是一个可执行的方法~
简单先梳理一下流程:
- 检查线程数是否超过核心线程数
- 如果没有超过,则通过addWorker阻塞添加新线程,并将command作为其firstTask,交由其执行
- 此时有可能添加线程失败了 / 一开始线程池已经超过了核心线程数 / 线程池停止运行,此时 worker >= 核心线程数 / !isRunning
- 检查是否仍在运行,如果运行则添加任务至任务队列
- 再次检查是否在运行,防止在入队时停止
- 如果停止,则回滚任务队列,如果回滚成功,说明command未执行,此时拒绝command
- 如果在运行,再次检查worker数量,如果work == 0,此时再 addWoker,否则不需要再添加新的线程(只需要有一个线程在运行,command就会被取出执行)
- 此时 !isRunning || 添加任务队列失败,直接尝试addWorker,并将command作为其firstTask,如果失败则reject Command
public void execute(Runnable command) {
    if (command == null) // Check NPE
        throw new NullPointerException();
    /*
     * Proceed in 3 steps:
     *
     * 1. If fewer than corePoolSize threads are running, try to
     * start a new thread with the given command as its first
     * task.  The call to addWorker atomically checks runState and
     * workerCount, and so prevents false alarms that would add
     * threads when it shouldn't, by returning false.
     * 1. 如果运行线程数少于核心线程数,尝试开启一个新线程并将给定command作为其第一个任务
     * 对于 addWorker原子类 调用检查runState和workerCount
     * 通过返回false,防止在不应该添加线程时添加线程而产生的false警报
     * 2. If a task can be successfully queued, then we still need
     * to double-check whether we should have added a thread
     * (because existing ones died since last checking) or that
     * the pool shut down since entry into this method. So we
     * recheck state and if necessary roll back the enqueuing if
     * stopped, or start a new thread if there are none.
     * 2. 如果任务能够成功排队,那么我们能需要再次检查我们是否可以添加一个线程
     * (因为存在一种可能:上次检查后,线程线程死亡),或者自从进入方法后,线程池已经关闭
     * 所以我们重新检查了state,并且必要情况下如果,如果停止则回滚排队,或线程池为空则启动新线程
     * 3. If we cannot queue task, then we try to add a new
     * thread.  If it fails, we know we are shut down or saturated
     * and so reject the task.
     * 3. 如果我们不能进行任务排队,我们尝试添加一个新线程,如果失败,我们就知道我们已经被关闭/已饱和,所以拒绝任务
     */
    int c = ctl.get();
    if (workerCountOf(c) < corePoolSize) {  // 获取比较当前运行线程数与核心线程数
        if (addWorker(command, true)) // 如果小于 < 核心线程数,将当前任务交给一个新的线程执行
            return; // 添加执行成功,则返回
        c = ctl.get();  // 否则重新获取线程池中线程数
    }
    // 此时已经 >= 核心线程数
    if (isRunning(c) && workQueue.offer(command)) {  // 检查线程数,并将command添加至阻塞队列
        int recheck = ctl.get(); // 二次检查
        if (! isRunning(recheck) && remove(command)) // 如果!isRunning则remove添加的任务
            reject(command); // 成功移除,说明任务未执行,此时拒绝任务
        else if (workerCountOf(recheck) == 0) // 仍在运行,统计work数量
            addWorker(null, false); // 如果为0,则添加新worker,此时任务已经进入队列,只需要添加Worker即可
    }
    else if (!addWorker(command, false)) // 入队失败,尝试再次添加新线程来执行command
        reject(command); // 失败则拒绝任务
}
addWorker
一切的一切,都与addWorker有关
private final ReentrantLock mainLock = new ReentrantLock(); // addWorker操作需要进行加锁

/**
* ps:我在这里才知道,原来Java也有类似于go-to的语法啊......continue-retry
* 检查是否当前根据池状态和给定边界(core/maximum)添加新的线程
* 如果是,则相应台哦正工作线程技术,并且如果可能的话,创建并启动一个新的工作线程,将firstTask作为其第一个任务运行
* 如果线程池已停止/符合关闭条件,此方法返回false
* 如果线程工厂在请求时创建线程失败,它也会返回false
* 如果线程创建失败/线程工厂返回null/异常(通常为线程中OutOfMemoeryError)我们干净地进行回滚
*/
private boolean addWorker(Runnable firstTask, boolean core) {
    retry:
    for (;;) {
        int c = ctl.get();
        int rs = runStateOf(c); // 获取state

        // Check if queue empty only if necessary.
       	// 如果SHUTDOWN || Running && !(Shutdown时firstTask==null&&workQueue==null)
        if (rs >= SHUTDOWN &&
            ! (rs == SHUTDOWN &&
               firstTask == null &&
               ! workQueue.isEmpty())
           )
            return false;

        for (;;) {
            int wc = workerCountOf(c);
            if (wc >= CAPACITY ||
                wc >= (core ? corePoolSize : maximumPoolSize))
                return false;
            if (compareAndIncrementWorkerCount(c))
                break retry;
            c = ctl.get();  // Re-read ctl
            if (runStateOf(c) != rs)
                continue retry;
            // else CAS failed due to workerCount change; retry inner loop
        }
    }

    boolean workerStarted = false;
    boolean workerAdded = false;
    Worker w = null;
    try {
        w = new Worker(firstTask);
        final Thread t = w.thread;
        if (t != null) {
            final ReentrantLock mainLock = this.mainLock;
            mainLock.lock();
            try {
                // Recheck while holding lock.
                // Back out on ThreadFactory failure or if
                // shut down before lock acquired.
                int rs = runStateOf(ctl.get());

                if (rs < SHUTDOWN ||
                    (rs == SHUTDOWN && firstTask == null)) {
                    if (t.isAlive()) // precheck that t is startable
                        throw new IllegalThreadStateException();
                    workers.add(w);
                    int s = workers.size();
                    if (s > largestPoolSize)
                        largestPoolSize = s;
                    workerAdded = true;
                }
            } finally {
                mainLock.unlock();
            }
            if (workerAdded) {
                t.start();
                workerStarted = true;
            }
        }
    } finally {
        if (! workerStarted)
            addWorkerFailed(w);
    }
    return workerStarted;
}
线程池线程如何执行方法
public void run() {
runWorker(this);
}

final void runWorker(Worker w) {
    Thread wt = Thread.currentThread();
    Runnable task = w.firstTask;
    w.firstTask = null;
    w.unlock(); // allow interrupts
    boolean completedAbruptly = true;
    try {
        while (task != null || (task = getTask()) != null) {
            w.lock();
            // If pool is stopping, ensure thread is interrupted;
            // if not, ensure thread is not interrupted.  This
            // requires a recheck in second case to deal with
            // shutdownNow race while clearing interrupt
            if ((runStateAtLeast(ctl.get(), STOP) ||
                 (Thread.interrupted() &&
                  runStateAtLeast(ctl.get(), STOP))) &&
                !wt.isInterrupted())
                wt.interrupt();
            try {
                beforeExecute(wt, task);
                Throwable thrown = null;
                try {
                    task.run();
                } catch (RuntimeException x) {
                    thrown = x; throw x;
                } catch (Error x) {
                    thrown = x; throw x;
                } catch (Throwable x) {
                    thrown = x; throw new Error(x);
                } finally {
                    afterExecute(task, thrown);
                }
            } finally {
                task = null;
                w.completedTasks++;
                w.unlock();
            }
        }
        completedAbruptly = false;
    } finally {
        processWorkerExit(w, completedAbruptly);
    }
}